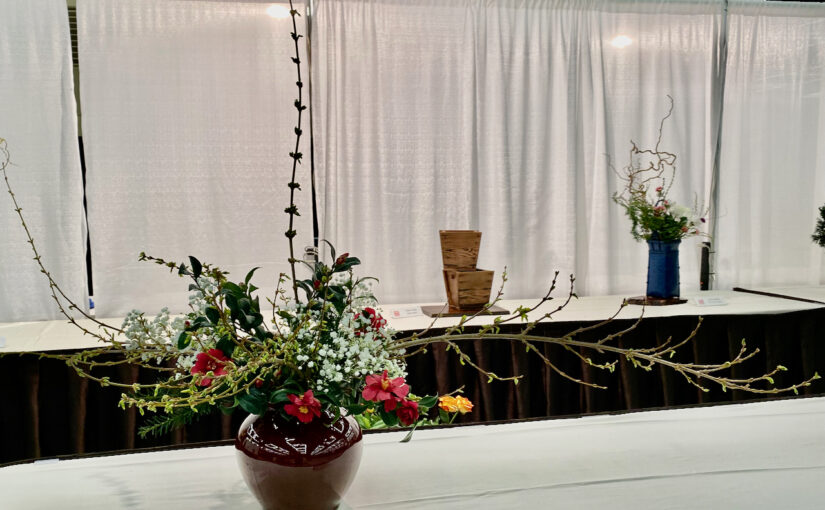
The process of making an arrangement
Photo by Author Akemi Sagawa
Held in Seattle every February, the Northwest Flower & Garden Festival is an exhibition of horticulture and gardening. It’s the second largest show of this kind in the country.
For 5 days, the usually monotonous event venue is completely transformed into lavish gardens. It’s always a delight to see the latest gardening trends and learn ideas on how to take of plants and landscaping.
Ikebana International Seattle Chapter is a regular participant in this annual festival.
Every year members of our chapter display Ikebana flower arrangements, sit in the booth and answer any questions the visitors might have about Ikebana. Unlike other merchant booths, we don’t sell anything. We simply share the joy of creating our ikebana flower arrangements.
The visitors come from all over the states, even from Canada. Every time we hear words of admiration from those visitors, we feel accomplished. We bring our own flower materials. The parking fee is going up, but we volunteers are happy to be attending the booth because our reward is to hear such admiration. Our hope is many more people get to know the beauty of Ikebana and get interested in learning it themselves.
I was assigned to place my arrangement where people will be looking from not only from the front but from all directions. While breaking symmetry, how can I make something interesting, something pleasing to the eyes? Keeping three basic elements of Ikebana, line, mass, and color, I prepared my arrangement.
I started by creating a horizontal line with forsythia branches. Forsythia’s bright yellow flowers bloom first thing in February in my yard. The buds were still hard, so I cut branches and kept them inside for several days so that they hasten to blossom.
I used a round container with a small opening on top. With this shape of the container, I can place long branches horizontally without tipping over the container.
The lines extend from the center to the side, showing the naturally beautiful curves. I made sure that the tip of the branches extended upwards, not downward, so that the energy flow of the arrangement is uplifting, not sagging. The secret of keeping the branch upward like this is hidden inside the mouth of the container. How exactly? Well, if you take an Ikebana class, the teacher will tell you the tricks you can use. It requires practice to master the trick, however.
Next, I chose camellias. The shiny, thick leaves with vivid green, and the burning red color of the flowers… I thought the camellia will be a nice contrast to the bright yellow of forsythia.
Camellia branches are also pretty long, but I cut them much shorter than those of forsythia. The basic structure of the arrangement is already defined by the lines created by the graceful forsythia branches, and I didn’t want to obstruct the structure by adding too long branches of camellia. Rather, I kept the camellia branches shorter and placed them strategically so that dense green leaves create volume here and there, and red colors on top of it.
The forsythia lines are sparse, and the camellia green leaves are dense in the center. This sparsity and density create a nice rhythm to the arrangement. The vivid red flowers on the tip of the green branches add an accent color.
Lastly, I placed lacy white baby breath in between. Since the color contrast of yellow, red, and green is stark, I wanted to add some softness to the arrangement. Baby breath is such a great material for this purpose. Its lacy flowers, placed delicately on top of the vivid red and green, do not hide them completely. Rather, the baby breath flowers become like a translucent shade to camellia, giving them a somewhat mysterious impression.
I’m not a professional photographer. I tend to believe that the real arrangement is far better than that in the photo above. Hopefully, this article helps you understand the process of how such an arrangement is created.
Our booth was not set ready yesterday, but by now all the arrangements must be complete. I will be going back to our booth again tomorrow evening as a hostess, so I will take photos of all the arrangements and share them with you. Please stay tuned!
